
Storm season is just starting here and already we have had one minor blackout during one really bad storm. During this blackout, I found that all our torches bar one had no battery. We have since stocked up on batteries, but during this time, we talked a lot about how people had lights in the old days when there was no electricity. This butter candle is a great experiment for kids and will make a great emergency candle.

Check out the list of materials that we use with this activity.
Butter Candle Experiment
After the short blackout, we were talking about electricity and how we rely on it so much, but what did they do when there was no electricity?While reading The Long Winter by Laura Ingalls Wilder, she talks of surviving the long winter with limited supplies and how they had to improvise and make do with what they could find. In chapter 19, Ma makes a button lamp with calico, a button, axle grease and a small saucer. when they run out of kerosene for their lamp.
If you know you may in a blackout for a long time or your battery is running our in your flashlight, this butter candle is a great way to add a little light to your room. But, be careful as candles and fire can be dangerous.
To make a butter candle, you will need:
- a stick of butter
- toothpick
- toilet paper
- scissors
- plate
- sharp knife
- matches
- glass jar

More Experiments
- Walking on Eggs
- Scientific Method Flip Book & Worksheets
- Strawberry DNA Experiment
- Rainy Day Experiment
- Carbon Dioxide Fire Extinguisher Experiment
- Elephant’s Toothpaste Experiment
- Jelly Bean Experiment
- 100+ Free Educational Resources
- Pop Rock Experiment
- Ice Insulation Experiment
- Popcorn and Milk Experiment
- Gummy Bear Experiment
- Acid or Base Experiment
- Floating Grapes Experiment
- Dissolving Candy Canes Experiment
- Dancing Raisins Experiment
- Fizzy Frozen Heart Experiment
- Toothpick Star Experiment
Method:
While still in its paper wrapping, cut the stick of butter in half. The harder/colder the butter is the cleaner it cuts. Place the butter cut side up on the plate.
Take the toothpick or you could use a skewer and make a hole in the centre of each half of butter. The hole should go all the way through the butter to the bottom.

Cut one piece of toilet paper half and then in half again so that you end up with four small squares. Paper towel would also work for this.

Fold one of the squares of toilet paper in half like a triangle and then twist it tightly. This will be the wick.
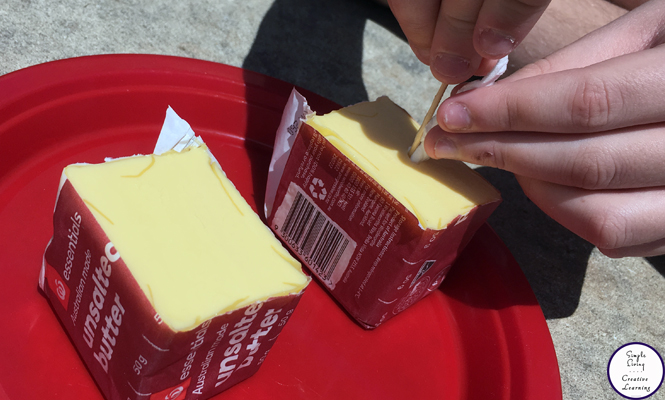
Push this wick into the hole, using the toothpick to help you push it down to the bottom.

Now you need to add some starter fuel to the wick. To do this, rub the wick around in the butter until it is nicely coated.
Then it is time to light your butter candle. Strike the match and hold the flame near the butter at the base of your toilet paper wick. This helps the butter to melt a little which helps your flame to become self-sustaining.

Place your butter candle in a glass jar to protect it from drafts and reducing the risk of it becoming a fire hazard. Depending on the size of your butter candles, but each half of a stick of butter can burn up to four hours each, giving you a total of eight hours light. If, after a couple of hours, you notice the wick falling over, use a paperclip to make a support for the wick.

How does this work? The wick, or toilet paper in this case, is naturally absorbent, absorbing the liquid wax, moving it upward while the candle is burning. Instead of burning, the vaporising wax cools the exposed wick and protects it. This vapor is flammable, and acts as the fuel for the flame.

Butter Candle Experiment
Ingredients
- 1 block butter
- toilet paper
- toothpick or skewer
- scissors
- plate
- knife
- matches
- glass jar
Instructions
- While still in its paper wrapping, cut the stick of butter in half. The harder/colder the butter is the cleaner it cuts. Place the butter cut side up on the plate.
- Take the toothpick or you could use a skewer and make a hole in the centre of each half of butter. The hole should go all the way through the butter to the bottom.
- Cut one piece of toilet paper half and then in half again so that you end up with four small squares. Paper towel would also work for this.
- Fold one of the squares of toilet paper in half like a triangle and then twist it tightly. This will be the wick.
- Push this wick into the hole, using the toothpick to help you push it down to the bottom.
- Now you need to add some starter fuel to the wick. To do this, rub the wick around in the butter until it is nicely coated.
- Then it is time to light your butter candle. Strike the match and hold the flame near the butter at the base of your toilet paper wick. This helps the butter to melt a little which helps your flame to become self-sustaining.
- Place your butter candle in a glass jar to protect it from drafts and reducing the risk of it becoming a fire hazard. Depending on the size of your butter candles, but each half of a stick of butter can burn up to four hours each, giving you a total of eight hours light. If, after a couple of hours, you notice the wick falling over, use a paperclip to make a support for the wick.
- How does this work? The wick, or toilet paper in this case, is naturally absorbent, absorbing the liquid wax, moving it upward while the candle is burning. Instead of burning, the vaporising wax cools the exposed wick and protects it. This vapor is flammable, and acts as the fuel for the flame.
Nutritional information is an estimate and provided as a courtesy. The values may vary according to the ingredients and tools that are used. Please use your preferred nutritional calculator for more detailed information.
 Christmas Matching Cards