
This gorgeous beaded Christmas Tree ornament is a fun little craft to complete this festive season. These easy to make trees will make great decorations for your tree or table this Christmas.

Check out the list of materials that we use with these printables.
Beaded Christmas Tree
Supplies you will need:
- Craft wire – 16 or 18 gauge craft wire for the shape of the tree
- Craft wire – memory, thin wire to hold the beads on
- Craft, flat nose pliers
- Crystal beads – a mix of different colours, shapes and sizes
To make your beaded Christmas Tree
- First, you will need to make the square shape at the bottom of the tree. To do this, take a 16 or 18 gauge craft wire and hold the wire from its end. Using the pliers, bend the wire to form a square shape. The square I made was 2 cm on all 4 sides.

- Next, we move onto making the triangle tree, so without cutting the wire, leave about 2 cm of the wire straight after crossing the square part. This will make the bottom side of the tree. Using the pliers, bend the wire about 45˚ towards the opposite direction of the square to continue to make the triangle tree. Bend the wire again, 45˚ towards the same direction.

- To finish the triangle tree, bend the wire towards the square part, keeping both sides of the triangle even while doing this. Overlap the square part and keep extra 2 cm. Cut off extra wire.

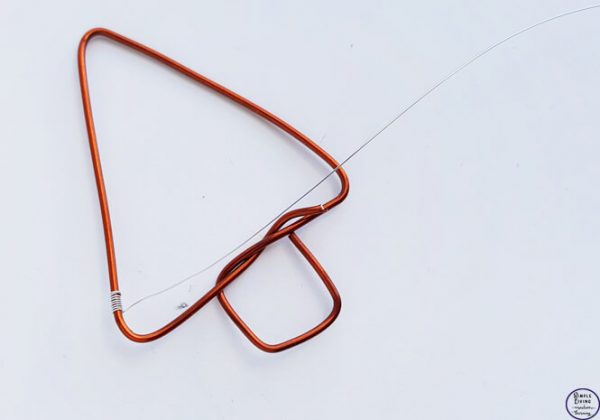
- To finish off the tree, coil the extra 2 cm wire around the bottom bar of the triangle so that it won’t come apart.

- To make the beaded part, you will need a long piece of memory wire. Coil one end of this wire around any one of the side bars of the triangle about 3 to 4 times.

- Add your desired beads onto the coiled wire through its open end. Place enough beads on until they reach the opposite bar of the tree frame. The beading should be inside the wire triangle. End this row by coiling the wire around the bar 3 to 4 times and then bring the wire inside the triangle again.

- Follow this pattern with the wire and the beads until the triangle is full with beading.

- Once the beading reaches the top of the triangle you can coil the remaining wire around the top end of the triangle and cut off extra wire.

You could add a lovely ribbon at the top of the tree to hang it on your Christmas tree or to decorate your house. If you use a large bead on the bottom row, you could write the recipients name on the bead, add a ribbon to the top of the tree and use it as a gift tag on your presents.
More Christmas Resources
- Felt Christmas Tree Ornaments
- Christmas Colour by Code Worksheets
- Christmas Size Sequencing Cards
- Christmas in Australia Printable Pack
- The Christmas Story
- 100+ Christmas Activities for Kids
- Christmas Math and Literacy Pre-Primer Pack

Enjoy!

Ingredients
- Craft wire - 16 or 18 gauge craft wire for the shape of the tree
- Craft wire - memory, thin wire to hold the beads on
- Craft, flat nose pliers
- Crystal beads - a mix of different colours, shapes and sizes
Instructions
- First, you will need to make the square shape at the bottom of the tree. To do this, take a 16 or 18 gauge craft wire and hold the wire from its end. Using the pliers, bend the wire to form a square shape. The square I made was 2 cm on all 4 sides.

- Next, we move onto making the triangle tree, so without cutting the wire, leave about 2 cm of the wire straight after crossing the square part. This will make the bottom side of the tree. Using the pliers, bend the wire about 45˚ towards the opposite direction of the square to continue to make the triangle tree. Bend the wire again, 45˚ towards the same direction.
- To finish the triangle tree, bend the wire towards the square part, keeping both sides of the triangle even while doing this. Overlap the square part and keep extra 2 cm. Cut off extra wire.
- To finish off the tree, coil the extra 2 cm wire around the bottom bar of the triangle so that it won't come apart.
- To make the beaded part, you will need a long piece of memory wire. Coil one end of this wire around any one of the side bars of the triangle about 3 to 4 times.
- Add your desired beads onto the coiled wire through its open end. Place enough beads on until they reach the opposite bar of the tree frame. The beading should be inside the wire triangle. End this row by coiling the wire around the bar 3 to 4 times and then bring the wire inside the triangle again.
- Follow this pattern with the wire and the beads until the triangle is full with beading.
- Once the beading reaches the top of the triangle you can coil the remaining wire around the top end of the triangle and cut off extra wire.


Nutritional information is an estimate and provided as a courtesy. The values may vary according to the ingredients and tools that are used. Please use your preferred nutritional calculator for more detailed information.
 Rocky Road Wreath