• Menu
  • Skip to right header navigation
  • Skip to main content
  • Skip to secondary navigation
  • Skip to primary sidebar

Before Header

Subscribe for Email Updates

logo

Providing printables, encouragement, tips and resources to help busy mums balance homeschooling, homemaking and frugal living.

  • Craft
  • Faith
  • Recipes
    • Recipe Index
  • Homeschooling
    • Free Printables
    • Google Slides ~ How To | Distance Learning
    • Printables By Grade
    • Printables By Subject
  • Homemaking
    • DIY & Frugal Living
  • Wellness
    • Essential Oils

Mobile Menu

  • Craft
  • Faith
  • Recipes
    • Recipe Index
  • Homeschooling
    • Free Printables
    • Google Slides ~ How To | Distance Learning
    • Printables By Grade
    • Printables By Subject
  • Homemaking
    • DIY & Frugal Living
  • Wellness
    • Essential Oils

DIY Plant Markers

This post may contain affiliate links. Please read my full disclosure policy.

Now that the weather is warming up, we have been able to get outside more and start a small vegetable garden. To remember what seeds we planted, we created these DIY Plant Markers from paddlepop sticks that we had lying around the house.

diy-plant-markers

These plant markers were easy and fun to make, allowing you to remember what you planted as well as adding a bit of colour to your garden.

To make these plant markers, you will need:

  • paddle pop sticks
  • hot glue gun
  • acrylic paint
  • permanent marker
  • clear wood finish (optional)

How to make them:

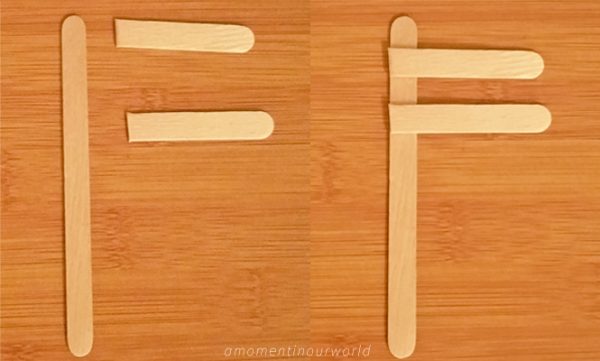
After working out how many plant markers you need to make, count out 2 paddle pop sticks per marker. 

Cut one of the paddle pop sticks in half and then glue the two halves to the top of the whole paddle pop stick with the hot glue gun.

diy-plant-markers-2

Once the glue is dry, paint you plant markers with the acrylic paint. You can use a variety of colours or just one colour, it is up to you. I do recommend you do it in a lighter colour so that you will be able to see the writing better.

Once the paint is dry, write on the names of the plants you are growing with the black sharpie or permanent marker. If you wanted to, you could write it on with a paintbrush and acrylic paint, or even stamps.

Grow Your Own Food in Pots eBook 

On the top row, I wrote the name of the plant. One the second row, I wrote the variety of seed I planted, though you could write the date of when you planted them on it. If I didn’t know the variety, I just left it blank.

To make them last longer, you can paint a coat of clear wood varnish to top.

diy-plant-markers-1 

Finally, place your plant markers in your garden!


Category: Garden, HomemakingTag: Activities, Craft, Garden

Love Free Printables?

Subscribe to receive weekly emails!

Previous Post: « Big River Holiday Park and Ski Lodge
Next Post: Review: HelpTeaching.com »

Reader Interactions

Leave a Reply Cancel reply

Your email address will not be published. Required fields are marked *

Recipe Rating


Primary Sidebar

Come and Join Us

Sourdough The Ultimate Guide to Sourdough for Beginners grab your copy

Support My Work

Love Free Printables?

Subscribe to receive weekly emails!

Categories

AMAZON ASSOCIATES DISCLOSURE

Simple Living. Creative Learning is a participant in the Amazon Services LLC Associates Program, an affiliate advertising program designed to provide a means for sites to earn advertising fees by advertising and linking to Amazon.com.

  • About
  • Contact
  • Privacy Policy
  • Disclosure
  • Cart
  • My Account

Return to top

Copyright © 2025 · Genesis Framework · Web design & hosting Servously.com · Log in