
A long-standing and historical way to preserve eggs for long-term storage is by water glassing them. The perfect time to do this is when egg production is at is highest. Preserving eggs for long term storage by water glassing them is a simple method for ensuring you have eggs when production is low.
Preserving Eggs by Water Glassing
As you may know, chickens naturally slow down their egg production during the cooler months of the year. As the daylight hours decrease, so does a chicken’s natural response, therefore a reduction of eggs.
Some people use artificial lighting to keep egg production high. We tend to allow the chickens to slow down and rest as nature intended.
We have over twenty-five chickens, so get quite a few eggs each day during the warmer months. As we are passionate about utilising all of our food resources and limiting waste, we use different methods to preserve the extra food resources when we can.
By preserving fresh eggs using the water glassing method, we are able to enjoy eggs all year round. Even when egg production has decreased.
What is Water Glassing?
So, what is this water glassing method? It is an historical method that has been used for centuries to keep eggs fresh. It is also quite easy to do as well as a very effective way to preserve eggs.
This method of preservation has been practiced since the 1800s.
By using this method, eggs can be stored for up to two years without refrigeration. We have had success so far for up to one year, though many have kept their water glassed eggs for two years and have said they are still perfectly fine to use.
Water glassed eggs do need to be kept in a place with reasonably steady temperatures, no extreme heat and/or freezing temperatures.
What Eggs to Use for Water Glassing?
Not all eggs can be used for water glassing. Washed or store-bought eggs are some that are unable to be preserved by using this method. You can preserve these eggs by freezing them.
The eggs that can be used for water glassing are fresh, unwashed eggs that were laid on the day that you are preserving them. These eggs have a natural protective layer (bloom) on them that will keep the lime solution from being absorbed into the eggs.
The eggs that are used in this preservation method must also be very clean. Free of dirt, debris, waste, and not broken or have any shell fragments. Do not attempt to wipe the eggs clean as this could remove the bloom. For the best eggs, practice having a clean environment for your chickens to lay eggs in and select the cleanest eggs that were laid that day to preserve.
You don’t need a lot of eggs to start with.
Just start with a few eggs and then add to your food-grade storage container as you collect more eggs.
What do Water Glassed Eggs look like?
When you open your storage container that you have been preserving your eggs in, you will find that the smell is something quite different. It doesn’t stink, or smell rotten, it just isn’t a lovely fresh smell.
Hopefully, none of your eggs will be floating. This is a great sign, though when you rinse the eggs before using, I do recommend doing the float test at the same time.
On cracking the egg open, you will find that the egg yolk will be slightly less firm and the white still clear. If your eggs are a little more watery, this may be due to the freshness of the eggs and the timeframe they were preserved in.
What you need for Preserving Eggs
To water glass eggs, you will need:
- Hydrated Lime – also known as pickling lime or calcium hydroxide
- Room temperature filtered or distilled water
- Food-grade storage container
- Eggs
Note: Hydrated lime is not the same lime that you find in agricultural or hardware stores.
Preparing the Solution
As you may see when you buy your lime, there may be some warnings on the bag.
When preparing the hydrated lime and water solution for your eggs, it is recommended for you to wear gloves. The lime can dry out your hands, so it is best to look after your skin and wear gloves, especially if you have sensitive skin.
When preparing the lime solution, you only use a small amount of the hydrated lime, and wash the eggs before using.
As time goes on, you will notice that the lime will tend to settle towards the bottom of the container. This is normal due to the weight of the lime.
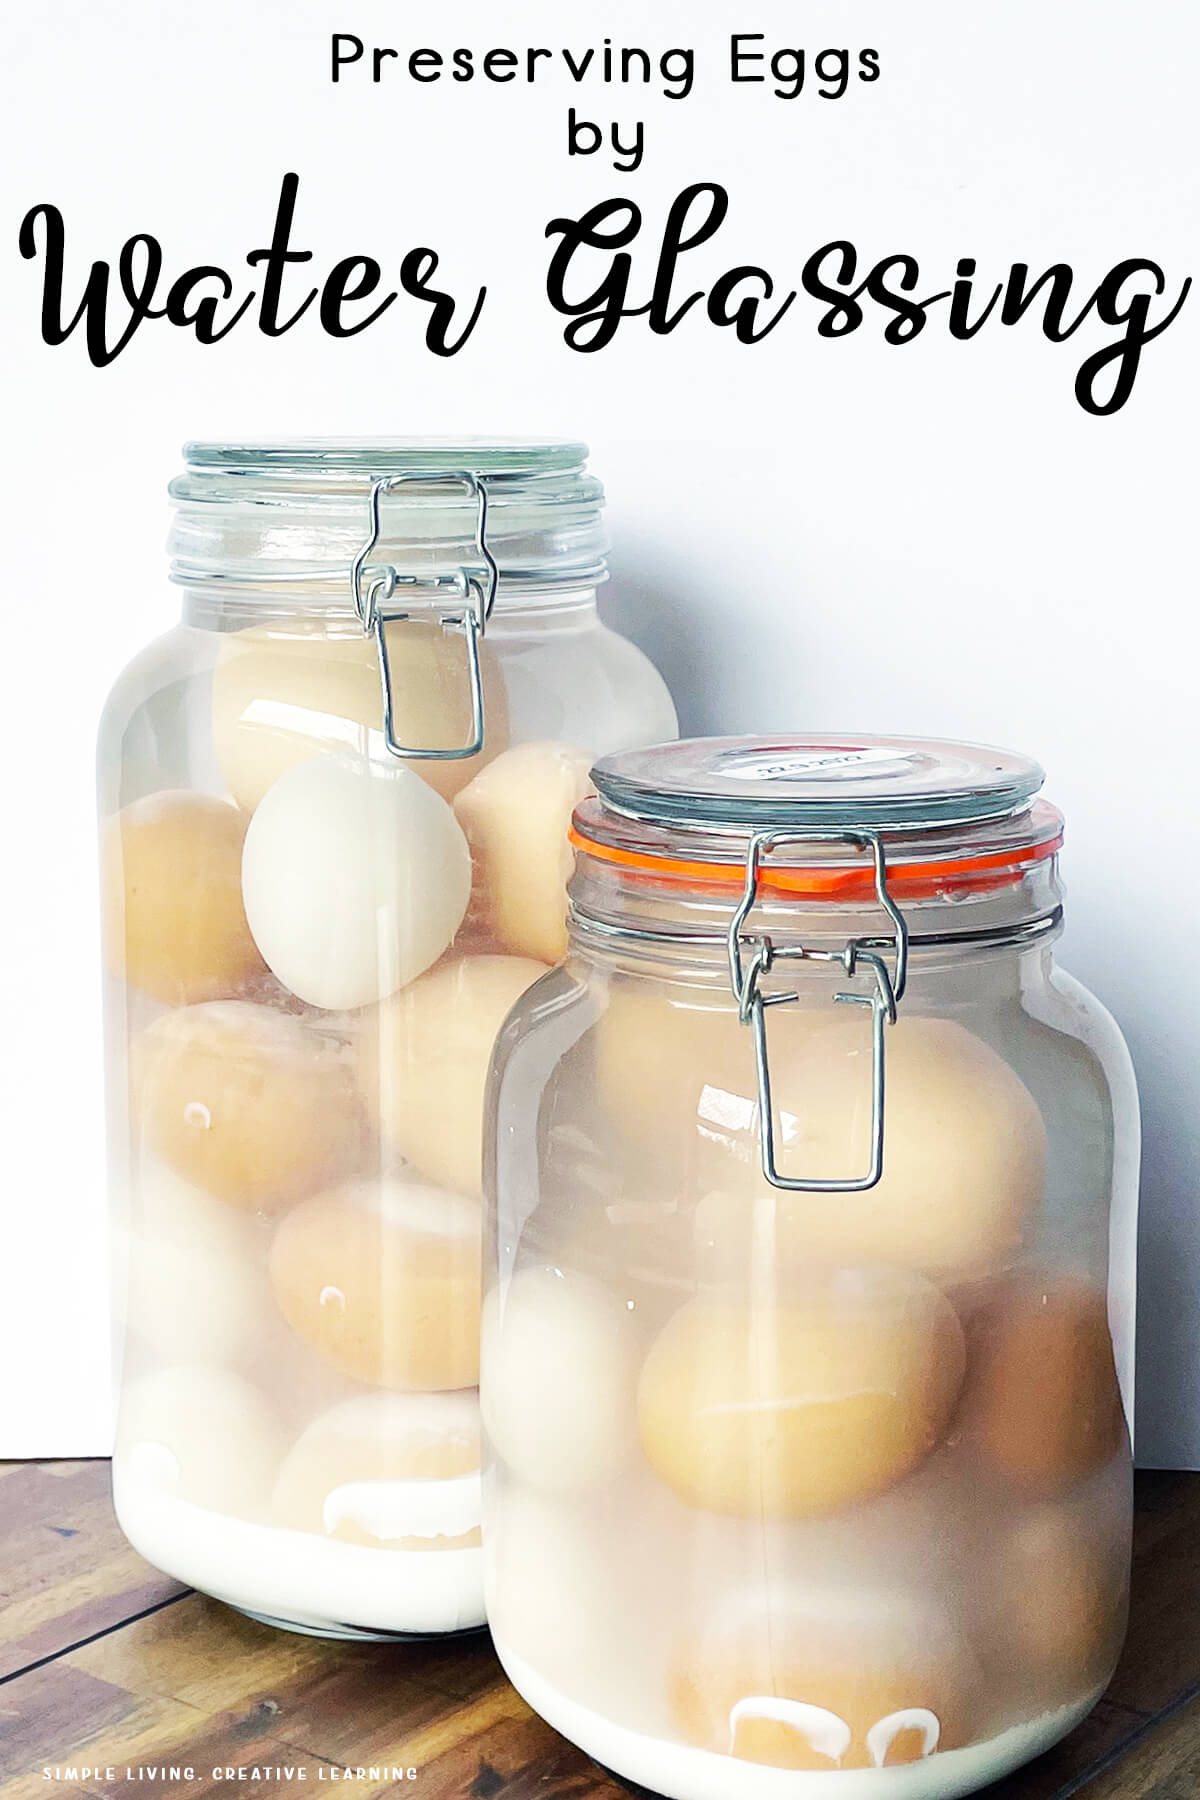
Start off with your clean storage container.The amount of eggs you want to preserve will determine what size container you need. Don’t go too big as the weight of the eggs can crush the eggs at the bottom of the container. A 5-gallon (18.9L) container is sufficient, though can be harder to work with. Remember, you can always fill more containers. A 3 gallon container can hold up to 80 eggs as well as the preserving liquid. This smaller container is also easier to move and makes it easier for reaching the eggs on the bottom for when you start removing the older eggs first.
The ratio of hydrated lime to water is 1 oz of lime to 1 quart of water. If using a 3 gallon container, 5 quarts of water to 5 oz of hydrated lime provides enough room for the eggs to be submerged. If using a 5 gallon container (18.9L), 8 quarts of water to 8 oz of hydrated lime is sufficient.
Reusing the Solution
After you have used all of your eggs in your container, the solution will be left. I would advise against reusing this solution again as it will not be at its prime to safely preserve eggs. I prefer to start a new batch of solution for each container of eggs that I am storing.

Preserving Eggs By Water Glassing
Equipment
- 3 Gallon (11.35L) Food-Grade Storage Container
Ingredients
- 5 oz Hydrated Lime, or pickling lime
- 5 quarts Filtered or distilled water
- Fresh Eggs
Instructions
- Start off with your clean storage container.The amount of eggs you want to preserve will determine what size container you need. Don't go too big as the weight of the eggs can crush the eggs at the bottom of the container. A 5-gallon (18.9L) container is sufficient. Remember, you can always fill more containers.
- The ratio of hydrated lime to water is 1 oz of lime to 1 quart of water. If using a 3 gallon container, 5 quarts of water to 5 oz of hydrated lime provides enough room for the eggs to be submerged. If using a 5 gallon container (18.9L), 8 quarts of water to 8 oz of hydrated lime is sufficient.
- Mix the hydrated lime in the water until completely dissolved. The water will look milky white.
- Next, gently add your unwashed, fresh eggs. When you arrive at the stage where you can start positioning the eggs, make sure to place them pointy side down as this allows the air cells to remain at the top of the eggs. This will result in a better quality egg.
- Securely add the lid to prevent the liquid from evaporating and the eggs from becoming exposed to the air.
- Store in a cool, dark place.
- Use eggs as needed, washing well prior to using. By taking out eggs closer to the bottom, ensures that you are using the older eggs first.
Nutritional information is an estimate and provided as a courtesy. The values may vary according to the ingredients and tools that are used. Please use your preferred nutritional calculator for more detailed information.
 Tasty Sourdough Discard Recipes