
This orange clove soap is spicy, yet fruity and relatively simple to make for a layered soap. The scent is amazing, leaving your skin feeling fresh and moisturised.

Orange Clove Soap
This orange clove soap consists of two layers. If you haven’t made layered soap before, there are a few things you should know.
Temperature
The temperature of the soap can have a huge impact on the way the soap is made. If the top layer is too hot when added, it will melt the layer under it. If the bottom layer is too hot, the top layer will run into it. To create the perfect layered soap, you will need to show some patience and wait for the bottom layer to cool down and set enough that when you blow on it, it doesn’t ripple. This can take up to 5 minutes or more, depending on the brand of soap base you use as every brand is different.
Air Bubbles
Air bubbles can appear on any soap that you make. I like to spray with a mist of 99% rubbing alcohol on top straight after pouring the soap into the mould. When adding a second layer, spray with the rubbing alcohol again, just before adding the second layer. This will help the two layers stick together.
If the bottom layer gets too hard, you can soap the top of it before spraying with rubbing alcohol and then pouring on the second layer. This will also help the layers stay together.
Setting
Layered soap needs to set properly before being removed from the mould. This helps the layers stay together and not split apart. I recommend leaving the soap a good 5 – 6 hours or even overnight before removing, just to make sure. If you are making this soap in a large mould that needs cutting when set, carefully lay the soap on its side and slice gently.
Phototoxic Oils
As you may be aware, some citrus essential oils, such as cold-pressed grapefruit, lemon and lime are phototoxic. This means that if you use one of these oils on your skin and then go out into the sun, some pretty bad damage such as severe burning and blistering can occur. Sweet Orange Essential Oil is not one of these phototoxic oils.
Sweet Orange Essential Oil
This delicious smelly essential oil is commonly used in skincare products not only for its aroma, but also due to its antioxidant and antiseptic properties. It is effective in keeping your skin clean and clear of acne, reducing dark spots and blemishes, boosting circulation, promoting cell growth, while also serving as an anti-depressant and anti-anxiety tool.
Clove Essential Oil
Clove essential oil has antibiotic, anti-fungal and antioxidant properties and is said to be beneficial for acne, bruises, infections, insect bites, and muscle pain. This essential oil has a lovely warm spicy scent, but remember, with this oil, a little goes a long way. This is one oil that is best avoided during pregnancy. Always test before using this oil as is may cause sensitivity in some people.
Essential Oils
Essential oils are potent, and need to be diluted. As this soap is being used on your body, you will need to use essential oils that are gentle enough to be applied to your skin – and used in the correct quantities. Test before using as well to make sure you aren’t sensitive to them.
Making Orange Clove Soap
To make 4 bars of this soap, you will need:
- 800g (1 ¾ lb) goats milk melt and pour soap base
- 1 tbsp dried orange zest
- 1 tbsp whole cloves
- 1 tsp ground cloves
- 5 drops clove essential oil
- 25 drops sweet orange essential oil
Tools you will need:
- 2 large microwave safe measuring cups, preferably with a spout
- Spoons for stirring the soap
- 4 inch silicone soap mould
- Spray bottle filled with rubbing alcohol
- Wavy soap cutter
Directions:
Cut the soap base into 1 inch cubes, if needed.
Separate the soap base, half in one microwavable measuring cup, half in the other microwavable measuring cup.
To make the bottom layer of soap, the clove layer, place one soap filled measuring cup in the microwave. Heat in 30 second intervals, stirring between each burst, until the soap base is fully melted.
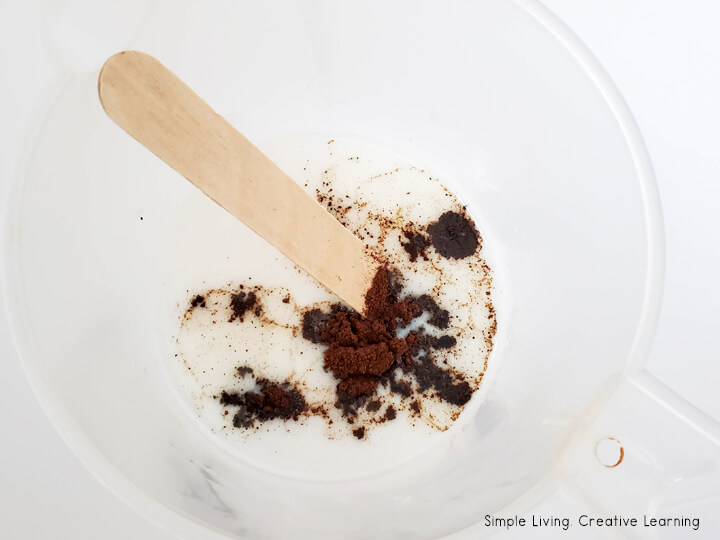
Add ground cloves to this melted soap base, and stir well. Continue stirring every so often for about 5 minutes, until the soap has cooled down a bit. This will help the color stay consistent, instead of sinking to the bottom.
Carefully add the clove essential oil to the soap base. Stir to mix through.

Pour this first layer of soap base into soap mould.
Spray with rubbing alcohol, to help reduce bubbles. It also helps the layers to form better.
Place the second soap base filled measuring cup in the microwave. Heat in 30 second intervals, stirring between each burst, until the soap base is fully melted. Let set for 2-3 minutes.

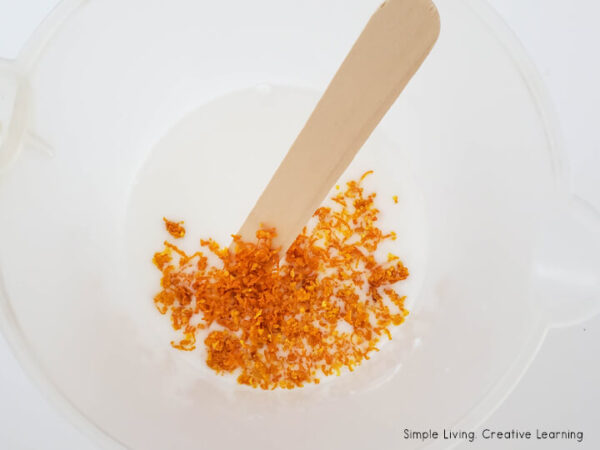
Give it a gentle stir, then add the orange zest. Mix well.
Gently add the orange essential oil and stir well.
Give the bottom layer of the soap in the mould a little spritz of the rubbing alcohol.

Carefully and gently pour the second soap base on top of the first soap layer.
Allow to set for a few minutes, until you see the layer starting to form.

Sprinkle the whole cloves over the top of the soap layer, lightly pushing into the soap if needed.
Let soap set for at least 4 hours.
Carefully remove the soap from the mould and cut into 1 inch bars.

More Homemade Soap Recipes
- Calendula Soap Bars
- Citrus Soap Bars
- Dandelion Lotion Bars
- Grapefruit and Mint Soap
- Lavender Soap
- Lemon Poppyseed Soap
- 3 Ingredient Hard Lotion Bars
- Honey Oatmeal Soap
- Nourishing Hand Soap for Gardeners

Orange Clove Layered Soap
Equipment
- 2 large microwave safe measuring cups, preferably with a spout
- spoon for stirring
- silicon soap mould - 4 inch
- spray bottle filled with rubbing alcohol
- wavy soap cutter
Ingredients
- 800g (1 ¾ lbs) goat milk melt and pour soap base
- 1 TBSP whole cloves
- 1 TBSP dried orange zest
- 1 tsp ground cloves
- 5 drops Clove Essential Oil
- 25 drops Sweet Orange Essential Oil
Instructions
- Cut the soap base into 1 inch cubes, if needed.
- Separate the soap base, half in one microwavable measuring cup, half in the other microwavable measuring cup.
- To make the bottom layer of soap, the clove layer, place one soap filled measuring cup in the microwave. Heat in 30 second intervals, stirring between each burst, until the soap base is fully melted.
- Add ground cloves to this melted soap base, and stir well. Continue stirring every so often for about 5 minutes, until the soap has cooled down a bit. This will help the color stay consistent, instead of sinking to the bottom.

- Carefully add the clove essential oil to the soap base. Stir to mix through.
- Pour this first layer of soap base into soap mould.
- Spray with rubbing alcohol, to help reduce bubbles. It also helps the layers to form better.
- Place the second soap base filled measuring cup in the microwave. Heat in 30 second intervals, stirring between each burst, until the soap base is fully melted. Let set for 2-3 minutes.
- Give it a gentle stir, then add the orange zest. Mix well.
- Gently add the orange essential oil and stir well.
- Give the bottom layer of the soap in the mould a little spritz of the rubbing alcohol.
- Carefully and gently pour the second soap base on top of the first soap layer.
- Allow to set for a few minutes, until you see the layer starting to form.
- Sprinkle the whole cloves over the top of the soap layer, lightly pushing into the soap if needed.
- Let soap set for at least 4 hours.
- Carefully remove the soap from the mould and cut into 1 inch bars.


DISCLAIMER: THESE STATEMENTS HAVE NOT BEEN EVALUATED BY THE FOOD & DRUG ADMINISTRATION. THE INFORMATION ON THIS SITE IS NOT INTENDED OR IMPLIED TO BE A SUBSTITUTE FOR PROFESSIONAL MEDICAL ADVICE, DIAGNOSIS OR TREATMENT. NEVER DISREGARD PROFESSIONAL MEDICAL ADVICE OR DELAY SEEKING MEDICAL TREATMENT BECAUSE OF SOMETHING YOU HAVE READ ON THIS WEBSITE.
 Lemon Simple Syrup