
The perfect way to boost your immune system and to combat a cold or flu this winter season is with this fermented honey garlic. This garlic is also great when used as a condiment, adding a lovely honey garlic flavour to your dish.

Fermented Honey Garlic
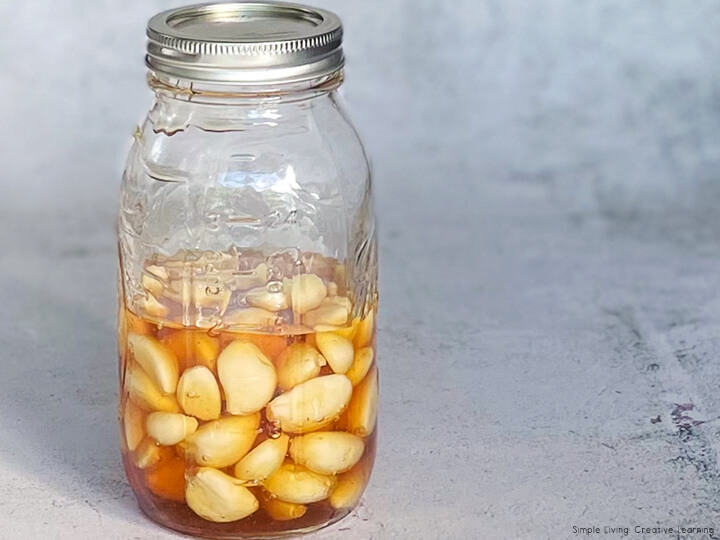
This fermented honey garlic need to be made in a large jar that is clean and dry. A wide-mouth jar is better for removing the honey garlic when using, though a regular-mouth jar will work too. The jar should be roughly double the size of your ingredients to allow for expansion. If you do use a smaller jar without much room, place a plate underneath the jar as the honey could possibly drip out.
NOTE – Babies under one year of age shouldn’t be given honey.
Why Do I need to make Fermented Honey Garlic?
This condiment not only tastes yummy, it can be used for many things.
- It is a good way to boost your immune system. The garlic does mellow slightly during the fermentation process, so if you are not keen on eating raw garlic, take a spoonful of the honey instead. Taking a spoonful of honey or a clove of garlic can help ease the symptoms of a cold or flu as well as soothe a sore throat.
- If you grow your own garlic, fermenting it is a great way to preserve it. The honey will help the garlic from getting mouldy or drying out.
- The garlic can be taken out and used in any dishes that need raw garlic, especially if you aren’t needing an intense garlic flavour. Recipes like hummus, salsa, dips, a glaze on meat or fish, vinaigrettes and dressings are just some of the many ways you can use this honey garlic.
Botulism
This usually isn’t a problem, just for peace of mind. A pH test strip can be used if there are any concerns about botulism. Botulism pores are unable to reproduce with a pH level less than 4.6. If the pH is too high, add a splash of raw apple cider vinegar to add more acidity, then retest.
Honey has an average pH of 3.9 which is well below the acidity danger zone of 4.6 and with the conditions of this product, being both acidic and a high sugar environment, no salt involved and with oxygen available due to fermentation process, it is unlikely to become an issue. In saying that, it is important to use pure raw honey in this recipe as a lot of commercial honey has been altered, which affects the pH levels and the natural microorganisms that are required for fermentation.
Appearance
Occasionally, you may find that a garlic clove will turn a bluish-greenish colour. This may be alarming, but not concerning. This may seem odd and a bit funky but it is perfectly normal. The garlic is not going bad, instead there has been a chemical reaction during the fermenting process that causes the garlic to change appearance. The fermented honey garlic is still able to be used.
Storage
As the saying goes – it gets better with age – we tend to consume ours within 6 – 8 months to be safe, though you could try it up to one year. The longer you leave it, the wiser it would be to test with pH strips. Though, once you start using the garlic, you could put the jar in the fridge if you wish.
When you start using your honey garlic, I recommend using the whole jar and then starting a new batch, not adding to this one as the environment for fermentation may not be ideal. You could even start a second batch when you are nearing the end of your first batch so that it will be ready, giving you a continuous supply of fermented honey garlic.
More Recipes
- How to Make Fermented Beets
- Homemade Ginger Kombucha
- How to Make Scrappy Apple Cider Vinegar
- How to Make a Sourdough Starter
- Fermented Carrots
- Honey, Lemon and Ginger Cough Drops
- Cinnamon Infused Honey
- Honey Butter Recipe
- Vanilla Infused Honey
- Honey Molasses Bread
- Outback Honey Wheat Bread
- Honey Oat Slice
- Heuningkoek
- Honey Slime for Kids

Fermented Honey Garlic
Equipment
- Glass Canning Jar with lid - 32oz or 1 L in size
Ingredients
- 1 cup organic garlic cloves, whole, peeled
- 1-1/2 cups raw honey, as needed to cover garlic
Instructions
- Make sure your glass jar and lid and clean and dry. A wide-mouth jar is better for removing the honey garlic when using, though a regular-mouth jar will work too. The jar should be roughly double the size of your ingredients to allow for expansion.
- Place the whole, peeled garlic cloves into the jar.
- Add the honey, making sure to completely cover all the garlic cloves.
- Place the lid loosely, onto the jar, then place in a dark place.
- Every day, tighten the lid and flip the jar upside down, making sure all garlic cloves are coated with the honey. Turn it right side up, loosen the lid slightly and return to the dark place.
- Within a few days, small air bubbles should start to form on the surface of the honey. This is the sign of active fermentation. Open the jar daily to release excess carbon dioxide. If fermenetation doesn't happen, add a spoonful or two of water into the mixture and repeat the flipping step, covering the garlic with honey.
- The mixture will continue to ferment, gradually slowing down. The honey will also thin out, the bubbling will stop and the garlic will sink to the bottom of the jar. This process usually takes around 30 days. From this point, you can store the fermented honey garlic in a sealed jar, in the pantry, unrefrigereated, to let age.
- For the best taste, this fermented honey garlic can be consumed after about 3 months. Store in a dark place at room temperature for 6-8 months.
Notes
- It is best to use raw honey as it contains all the natural microorganisms that are necessary for fermentation. A lot of commercial honey has been altered, which can affects the pH levels and the natural microorganisms that are required for fermentation.
- Botulism usually isn't a problem, just for peace of mind. A pH test strip can be used if there are any concerns about botulism. Botulism pores are unable to reproduce with a pH level less than 4.6. If the pH is too high, add a splash of raw apple cider vinegar to add more acidity, then retest.
- If you do use a smaller jar without much room, place a plate underneath the jar as the honey could possibly drip out.
- Occasionally, you may find that a garlic clove will turn a bluish-greenish colour. This may be alarming, but not concerning. The fermented honey garlic can still be used.
- Babies under one year of age shouldn't be given honey.
Nutrition
Nutritional information is an estimate and provided as a courtesy. The values may vary according to the ingredients and tools that are used. Please use your preferred nutritional calculator for more detailed information.
 Number 8 Printables
Sarita
Sounds like a useful home remedy! Thanks for sharing at The Homestead Blog Hop!
Cathy Brewer
I’m confused. Some say put the lid on tight, some say loose. I have mine in an apothocary jar with the seal and clip lid. I made it on Friday and when I checked on Monday, no bubbles were present. I turned it upside down to coat the garlic. Should there be bubbles present at this point? Should I add apple cider vinegar? I want to make more of this but I want to also make sure that it is right before I mess up a bunch of garlic and honey or make someone sick. Please help. Thanks.
S Jones
As the honey garlic ferments, it release carbon dioxide. Leaving the lid loose helps the carbon dioxide to slowly release, which helps if you forget to burp the jar. You will need to tighten the lid when you are flipping the jar. The bubbles may take up to a week to present themselves. You can speed up the fermentation process by adding a teaspoon of organic apple cider vinegar if you wish, though I have never needed to do this.