
If your muscles have been sore or your back been aching, then you must try this soothing pain relief rub. This DIY Sore Muscle Rub is great for soothing tense muscles after a bad’s night sleep or strenuous activities. It can also help ease tension headaches when rubbed into the back of your neck and shoulders.

DIY Sore Muscle Rub
This sore muscle rub penetrates deeply, helping relieve the pain from achy, sore and tense muscles. Natural and simple to make, this rub works well and quickly, and smells so much better than those purchased from the store.
What can this DIY sore muscle rub be used for?
- as a temporary relief of achy or overworked muscles
- help relieve tense neck and shoulder pain
- help relieve simple backaches
- occasional muscle fatigue
- after workout, housework, gardening, or just a long day
Before Using this Rub
Before using this rub, you will need to understand a few things.
- Essential oils are potent, and need to be diluted. As this rub is being used on your body, you will need to use essential oils that are gentle enough to be applied to your skin – and use in the correct quantities. Be careful to avoid sensitive areas like your eyes.
- Be mindful of who will be using the salve when adding essential oils as some people can’t use some oils and some oils can’t be used on young children or pregnant and breastfeeding mothers. Some essential oils should not be used on children under 10. Do your research before adding and using any essential oils!
- Don’t use on skin with open wounds or cuts.
- Test on small area of skin before using. If there’s any irritation, dilute with more carrier oils.
- Wash hands well after using.
Making Sore Muscle Rub
This recipe will make 1 x 2oz tin of rub.
To make it, you will need:
- ¼ cup sweet almond oil
- 1 TBSP beeswax pellets
- 8 Drops Peppermint Essential Oil
- 8 Drops Lavender Essential Oil
- 8 Drops Eucalyptus Essential Oil
- 5 Drops Clove Essential Oil
- Microwave safe jug
- Wood stick or spoon for stirring
- 2 oz metal tin

Place the beeswax and the sweet almond oil in the microwave safe jug.
Heat in the microwave for 30 second intervals, stirring between each heat session until the beeswax is fully melted.

Carefully add the essential oils and stir well.

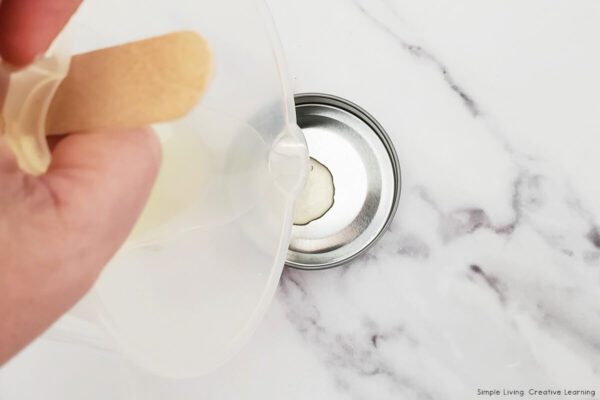
Pour the mixture into the tin and allow to set before putting the lid on.

To Store
-
Store in a dry place out of direct sunlight.
-
This rub should last around 6 + months when stored correctly.

To Use
Using clean hands, rub a small amount of the rub onto your fingers, then rub it in the intended site.
Notes:
- You can use any type of carrier oil instead of the sweet almond oil. You can use avocado oil, coconut oil, olive oil, jojoba oil, etc.
- If you want this to be a vegan recipe, use candelilla wax instead of beeswax.
- I live in a hot climate, so this is made with extra beeswax to stop it from melting during hot summers, thus making this a harder rub. Use less beeswax if you want a softer balm.

More Homemade Products
- Homemade Calendula Oil
- Homemade Vapour Rub
- 35+ Self Care Products to Make
- Make Healing Calendula Salve
- What are Carrier Oils and How do you use them?
- Homemade Dishwasher Tablets
- Essential Oil Binder
- Magnesium Body Lotion
- Cracked Foot & Heel Balm
- Herbal Muscle Salve
- Rose Salve
- Rosemary Salve
- Comfrey Salve
- Make a Herb Infused Oil

DIY Sore Muscle Rub
Equipment
- Microwave Safe Jug
- Wood stick or spoon for stirring
- 2 oz metal tin
Ingredients
- ¼ Cup Sweet Almond Oil
- 1 TBSP Beeswax Pellets
- 8 Drops Peppermint Essential Oil
- 8 Drops Lavender Essential Oil
- 8 Drops Eucalyptus Essential Oil
- 5 Drops Clove Essential Oil
Instructions
- Place the beeswax and the sweet almond oil in the microwave safe jug.
- Heat in the microwave for 30 second intervals, stirring between each heat session until the beeswax is fully melted.

- Carefully add the essential oils and stir well.
- Pour the mixture into the tin and allow to set before putting the lid on.
- Using clean hands, rub a small amount of the rub onto your fingers, then rub it in the intended site.
- Store in a dry place out of direct sunlight.This rub should last around 6 + months when stored correctly.


Notes
- You can use any type of carrier oil instead of the sweet almond oil. You can use avocado oil, coconut oil, olive oil, jojoba oil, etc.
- If you want this to be a vegan recipe, use candelilla wax instead of beeswax.
- I live in a hot climate, so this is made with extra beeswax to stop it from melting during hot summers, thus making this a harder rub. Use less beeswax if you want a softer balm.
Disclaimer: These statements have not been evaluated by the Food & Drug Administration. The information on this site is not intended or implied to be a substitute for professional medical advice, diagnosis or treatment. Never disregard professional medical advice or delay seeking medical treatment because of something you have read on this website.
 Easy Devilled Eggs