
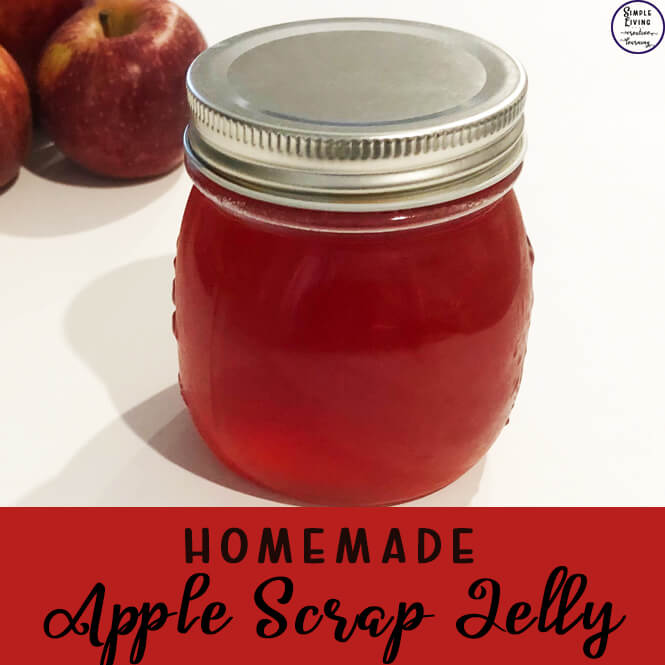
After making some apple crumble with apples, I had a lot of apple peel and cores left over that I didn’t want to waste. There is so much you can do with left over apple scraps and here is one of them – Apple Scrap Jelly.

Apple Scrap Jelly
If you don’t have a lot of apple scraps, you could freeze the ones you do have and continue adding to them until you have enough to make this Apple Scrap Jelly. Also, it doesn’t matter if they are all red, or all green or a mixture of apples just make sure to clean the apples properly before peeling – organic are best. The only thing that will change is the colour of your jelly.
Getting Jams and Jellies to Set
For jams and jellies to thicken and set, they need a substance known as pectin. Some fruits naturally contain more pectin than others. When making jams and jellies with low-pectin fruits, often lemon juice is added.

High-pectin Fruits
- Apples
- Blackcurrants
- Redcurrants
- Gooseberries
- Raspberries
- Plums
- Cranberries
- Oranges
- Lemons
- Apricots
Low-pectin fruits
- Blackberries
- Blueberries
- Strawberries
- Rhubarb
- Peaches
- Cherries
If you are using low-pectin fruits in your jam, you should also add some lemon juice or perhaps mix in some high-pectin fruit to help your jam to set. Alternatively, using jam sugar with low-pectin fruit works well. To make jam, you need to soften the fruit first.
The mixture will need to boil and thicken and you will need to stir it frequently so that it doesn’t burn or stick to the bottom of the pot. If you have a candy thermometer, it needs to read 105°C (220°F), though you will need to keep a close eye on the mixture when it starts getting around this temperature.
If you don’t have a thermometer, you can use the jam / cold plate test. Before starting your jam, simply place 3 or 4 small plates in the freezer. When you think the jam may be ready, place a small teaspoon amount of jam onto one of the cold plates from the freezer and let it sit for about 30 seconds. Then run your finger through the middle of the blob of jam. If the line starts to fill back over, it means the jam is too runny and is not ready yet, so keep cooking and repeat again in about five minutes. If the line remains, then the jam has reached setting point and is ready.
This jelly needs to be placed into sterilised jars. It will need to be stored in the fridge and not the pantry. Though, if you follow the correct instructions for canning you will be able to store it in the pantry.
Other Bread and Spread Recipes
- Milk Bread Rolls
- Homemade Bread
- Pumpkin and Blueberry Bread
- Pizza Bread
- Strawberry Jam
- Rosella Jam
- Mulberry Jam
- Slowcooker Apple Butter
- Orange and Lemon Marmalade
- Lemon Curd
- Blueberry Jam
- Passionfruit Curd
Why Didn’t my Apple Jelly Set?
There are many reasons as to why your jam didn’t set. It may have needed to be cooked longer or sometimes, the fruit you used didn’t have enough natural sugar and needed a little more pectin added.
If you followed these instructions and your jam didn’t set properly, place your jam in the fridge overnight. If it isn’t set in the morning, you could try re-cooking it a bit longer and may adding a bit of pectin or some more sugar and lemon, though have a taste test you don’t want to add too much that it may affect the flavour.
Sterilisation
There are a few ways to sterilise your jars, this is the one I use.
Wash the jars and lids in hot, soapy water. Rinse the jars in hot water, do not dry and place upside down on racks in an oven heated to 120˚c to dry completely. You can line the racks with baking paper first if you want. To sterilise the lids, place them in boiling water for 5 minutes.
Fill the jars while they are still hot. Do not place cold jam into hot jars or they may crack and break.
Uses
Apple Scrap Jelly is a wonderful alternative to jam, being added as a spread to bread, toast or as a filling for cakes. It can also be used in savoury dishes alongside roasts, chicken and pork. You can use in place of redcurrant jelly.

Apple Scrap Jelly
Ingredients
- 20-30 apple peels and cores
- sugar
- lemon juice, freshly squeezed
- water
Instructions
- If you are canning this recipe, start sterilising your jars now.
- Place the apple peels and cores in a large pot.
- Add water until the apple is just covered.
- Boil until the apple cores are soft and mushy. The water level will have decreased as well.
- Strain out the apple scraps.
- Measure the liquid and pour it back into the large pot.
- For each cup of liquid you add back, add 1/2 cup sugar and 1 TBSP lemon juice.
- Bring to the boil and cook, stirring often until the mixture reaches gel point.
- If you have a candy thermometer, it needs to read 105°C (220°F), though you will need to keep a close eye on the mixture when it starts getting around this temperature.
- If you don’t have a thermometer, you can use the jam / cold plate test. Before starting your jam, simply place 3 or 4 small plates in the freezer. When you think the jam may be ready, place a small teaspoon amount of jam onto one of the cold plates from the freezer and let it sit for about 30 seconds. Then run your finger through the middle of the blob of jam. If the line starts to fill back over, it means the jam is too runny and is not ready yet, so keep cooking and repeat again in about five minutes. If the line remains, then the jam has reached setting point and is ready.
- Ladle into sterilsed jars leaving 1/2 inch of headspace. Screw on the lids.
- Process in a boiling water bath for 5 minutes.
Nutritional information is an estimate and provided as a courtesy. The values may vary according to the ingredients and tools that are used. Please use your preferred nutritional calculator for more detailed information.
 Third Grade Sight Words Books
Melissa
My apple peelings are brown .. Can I still make apple jelly with them.. Thank you
S Jones
I haven’t used brown peelings in this jelly, as I make it straight away. The pectin is in the peels and cores which is generally higher when fruit is just barely ripe and diminishes as it matures from fully ripe to overripe. As I state in the post, you can freeze them peels and cores until to you enough. Are your peels brown from being in the freezer?
Diana
I froze all of my apple peels and cores until I had enough to make a good batch of jelly. They were all brown or “oxidized”. There is nothing wrong with them. It’s the same as when your apples change color if left out of a citrus bath to prevent oxidation when making a pie. In my opinion, if that is what is wrong with them, I would use them. Waste not, want not!
nancy jachim
I cook mine in a slow cooker. They turn brown cause I cook them slowly for a day.
I drain mine in a pot using a hanging pillow case.
I think it has more flavor when slow cooked longer.
Tom Hill
Very good recipe my wife and I have made apple butter and pie filling today. Scrap jelly tomorrow. Thanks for sharing
April Kelley
Can you tell me where you got your jars?
S Jones
I think I got them from Kmart or Big W. I have had them for a long time, and can’t exactly remember.
kathy a seiber
made this jelly canned it did not set taste really good ,but just sweet apple juice ,any suggestions i don-t want to throw away if something i could do . katmaw1951@gmail.com
S Jones
As per the post, if it doesn’t set, you could try re-cooking it a bit longer and may be adding a bit of pectin or some more sugar and lemon, though have a taste test you don’t want to add too much that it may affect the flavour.
Did you check the temperature or do the plate test before removing from the heat?
How did you can it?
Missy
I would LOVE advice on how to make this work. I’ve tried pectin free apple jelly 5 times and it’s never worked. I check the candy thermometer 220°-230°. I’ve done the freezer test and everything says it’s good but then it’s pure liquid when I can it. What can I do differently? I’m redoing this batch to add pectin as it’s been only sitting overnight but I just don’t know what I’m missing.
S Jones
If you are sure the mixture is ready (getting to temperature and passing the freezer test), it may be the apples that you are using. Tart apples such as Granny Smith, are higher in pectin than red ones. Red apples add a lovely colour to the jelly, so try adding more green apples to your batch of apple scrap jelly.
Dina
How much sugar do you start with? The only amount given in the recipe is apples to use.
S Jones
As it states in the recipe – After boiling the apple cores / peels etc. you drain the liquid into a bowl. Then, measure this liquid and pour it back into the large pot.
For each cup of liquid you add back, add 1/2 cup sugar and 1 TBSP lemon juice.