
Our solar system is full of planets, the sun, moons, comets and stars as well as a long list of other things. And learning about the solar system is so much fun! When combining it with food, it makes it such as great educational activity that provides enjoyment while learning. This sugar cookie solar system activity is a fun way to learn the order of the eight planets in our solar system.
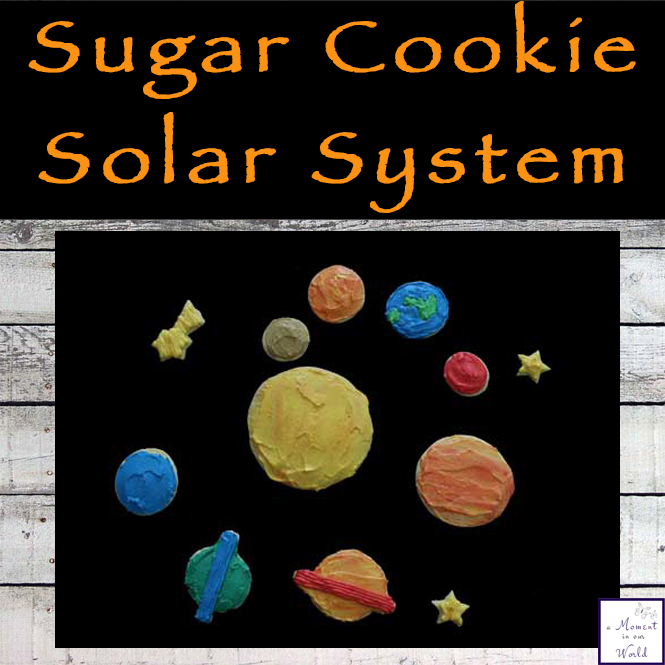
 Sugar Cookie Solar System
First we made the sugar cookies and when they were cool, we iced them. I used a cookie cutter to cut out the direct circle shapes. We made eight different coloured icing colours, mixing these to get the colours we wanted. The eight colours we used were: grey, black, red, yellow, orange, blue, white and green.
Here is a list of how we mixed the colours for the icing for each of our planets:
- Mercury – grey, yellow and orange
- Venus – yellow and orange
- Earth – green and blue
- Mars – red
- Jupiter – yellow, orange and white
- Saturn – yellow, orange and red for the rings
- Uranus – blue and green and then blue for the rings
- Neptune – blue
- We used yellow and orange for the sun and grey for the moon.
We also added a little bit of this Twinkle Shining Powder to all our cookies, to give them a little shine!
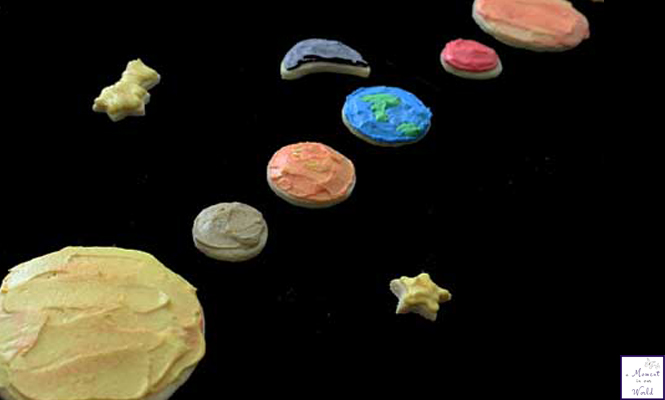
Here is a closer looks at the Sun, Mercury, Venus, Earth, Moon and Mars

And of Jupiter, Saturn, Uranus and Neptune

You could also make moons for each of the other planets, though some of them have a lot, which is why we only made the moon for planet Earth.
Ingredients for Sugar Cookies
To make around 20 cookies, you will need:
- 1 Cup Butter, Softened
- 1 tsp Vanilla Extract
- 1 Cup White Sugar
- 1 Egg
- 2 tsp Baking Powder
- 3 Cups Plain Flour
Making Sugar Cookies
To make the sugar cookies, first preheat the oven to 175˚C or 350˚F.
Line cookie trays with baking paper.
Add the butter and sugar to a bowl and beat with electric beaters until creamy and smooth.
Add the vanilla and egg and mix through.
In a separate bowl, shift the flour and baking powder together.
Slowly add the flour to the wet ingredients, mixing as you go. If it gets too stiff, turn out the dough onto a floured surface and finish kneading with damp hands.
Divide the dough into workable batches and roll out on a floured surface.
Using cookie cutters, cut out the shapes that you want.
Place the cookies onto the prepared baking trays and bake for 6 to 10 minutes.
Remove from oven and let cool on the tray for a few minutes before transferring to a cooling rack.
When cooled completely, ice with purchased or homemade icing.
Note: This is a no-chill dough, though you can chill it if you wish. Just remove from the fridge and let it sit on the bench for 10 minutes before working with it.
Other Space and Solar System ideas
- Phases of the Moon Flip Book
- Galaxy Shirt
- Swirly-Whirly Planets
- Watercolour Solar System
- Space Cards
- Space Activity Pack
- Space Explorers Activities
- Solar Eclipse Printables
- Phases of the Moon Activities
- Printable Constellation Book
- Constellation Cards
We played a fun game with these Sugar Cookies Solar System cookies too. We made multiple cookies of each planet, sun and moon. The boys would choose one cookie and before they ate it, they would recite one fact about the planet, sun or moon cookie they were holding. If they didn’t know any facts, they would do some quick research before taking a cookie.
Sugar Cookie Recipe
Ingredients
- 1 Cup Butter softened
- 1 tsp Vanilla Extract
- 1 Cup White Sugar
- 1 Egg
- 2 tsp Baking Powder
- 3 Cups Plain Flour
Instructions
- To make the sugar cookies, first preheat the oven to 175˚C or 350˚F.
- Line cookie trays with baking paper.
- Add the butter and sugar to a bowl and beat with electric beaters until creamy and smooth.
- Add the vanilla and egg and mix through.
- In a separate bowl, shift the flour and baking powder together.
- Slowly add the flour to the wet ingredients, mixing as you go. If it gets too stiff, turn out the dough onto a floured surface and finish kneading with damp hands.
- Divide the dough into workable batches and roll out on a floured surface.
- Using cookie cutters, cut out the shapes that you want.
- Place the cookies onto the prepared baking trays and bake for 6 to 10 minutes.
- Remove from oven and let cool on the tray for a few minutes before transferring to a cooling rack.
- When cooled completely, ice with purchased or homemade icing.
Notes
- This is a no-chill dough, though you can chill it if you wish. Just remove from the fridge and let it sit on the bench for 10 minutes before working with it.
Nutrition
Nutritional information is an estimate and provided as a courtesy. The values may vary according to the ingredients and tools that are used. Please use your preferred nutritional calculator for more detailed information.
 Make your Own Rock Candy
Ann
How did you cut the planet shapes? Cookie cutters? Thanks…these are super cute!
Stacey
Hi! I used cookie cutters for the shapes. For the planets with the rings around them, I used the cookie cutters to make in imprint into the dough and then used a knife to cut out the shape and ring.